Refer to the following scenario to answer the question below. Your integration has the following runs in the integration events report (Date format of MM/DD/YYYY):
Run #1
• Core Connector: Worker Integration System was launched on May 15, 2024 at 3:00:00 AM.
• As of Entry Moment: 05/15/2024 3:00:00 AM
• Effective Date: 05/15/2024
• Last Successful As of Entry Moment: 05/01/2024 3:00:00 AM
• Last Successful Effective Date: 05/01/2024
Run #2
• Core Connector: Worker Integration System was launched on May 31, 2024 at 3:00:00 AM.
• As of Entry Moment: 05/31/2024 3:00:00 AM
• Effective Date: 05/31/2024
• Last Successful As of Entry Moment: 05/15/2024 3:00:00 AM
• Last Successful Effective Date: 05/15/2024 On May 13, 2024 Brian Hill receives a salary increase. The new salary amount is set to $90,000.00 with an effective date of April 30,2024. Which of these runs will include Brian Hill's compensation change?
Brian Hill will be included in both integration runs.
Brian Hill will only be included in the second integration run.
Brian Hill will only be included in the first integration run.
Brian Hill will be excluded from both integration runs.
The scenario involves a Core Connector: Worker integration with two runs detailed in the integration events report. The goal is to determine whether Brian Hill’s compensation change, effective April 30, 2024, and entered on May 13, 2024, will be included in either of the runs based on their date launch parameters. Let’s analyze each run against the change details to identify the correct answer.
In Workday, the Core Connector: Worker integration in incremental mode (as indicated by the presence of "Last Successful" parameters) processes changes based on the Transaction Log, filtering them by theEntry Moment(when the change was entered) andEffective Date(when the change takes effect). The integration captures changes where:
TheEntry Momentfalls between theLast Successful As of Entry Momentand theAs of Entry Moment, and
TheEffective Datefalls between theLast Successful Effective Dateand theEffective Date.
Brian Hill’s compensation change has:
Entry Moment:05/13/2024 (time not specified, so we assume it occurs at some point during the day, before or up to 11:59:59 PM).
Effective Date:04/30/2024.
Analysis of Run #1
Launch Date:05/15/2024 at 3:00:00 AM
As of Entry Moment:05/15/2024 3:00:00 AM – The latest point for when changes were entered.
Effective Date:05/15/2024 – The latest effective date for changes.
Last Successful As of Entry Moment:05/01/2024 3:00:00 AM – The starting point for entry moments.
Last Successful Effective Date:05/01/2024 – The starting point for effective dates.
For Run #1 to include Brian’s change:
TheEntry Moment(05/13/2024) must be between 05/01/2024 3:00:00 AM and 05/15/2024 3:00:00 AM. Since 05/13/2024 falls within this range (assuming the change was entered before 3:00:00 AM on 05/15/2024, which is reasonable unless specified otherwise), this condition is met.
TheEffective Date(04/30/2024) must be between 05/01/2024 (Last Successful Effective Date) and 05/15/2024 (Effective Date). However, 04/30/2024 isbefore05/01/2024, so this condition isnot met.
Since the effective date of Brian’s change (04/30/2024) precedes theLast Successful Effective Date(05/01/2024), Run #1 will not include this change. In incremental mode, Workday excludes changes with effective dates prior to the last successful effective date, as those are assumed to have been processed in a prior run (before Run #1’s baseline of 05/01/2024).
Analysis of Run #2
Launch Date:05/31/2024 at 3:00:00 AM
As of Entry Moment:05/31/2024 3:00:00 AM – The latest point for when changes were entered.
Effective Date:05/31/2024 – The latest effective date for changes.
Last Successful As of Entry Moment:05/15/2024 3:00:00 AM – The starting point for entry moments.
Last Successful Effective Date:05/15/2024 – The starting point for effective dates.
For Run #2 to include Brian’s change:
TheEntry Moment(05/13/2024) must be between 05/15/2024 3:00:00 AM and 05/31/2024 3:00:00 AM. However, 05/13/2024 isbefore05/15/2024 3:00:00 AM, so this condition isnot met.
TheEffective Date(04/30/2024) must be between 05/15/2024 (Last Successful Effective Date) and 05/31/2024 (Effective Date). Since 04/30/2024 isbefore05/15/2024, this condition is alsonot met.
In Run #2, theEntry Moment(05/13/2024) precedes theLast Successful As of Entry Moment(05/15/2024 3:00:00 AM), meaning the change was entered before the starting point of this run’s detection window. Additionally, theEffective Date(04/30/2024) is well before theLast Successful Effective Date(05/15/2024). Both filters exclude Brian’s change from Run #2.
Conclusion
Run #1:Excluded because the effective date (04/30/2024) is before the Last Successful Effective Date (05/01/2024).
Run #2:Excluded because the entry moment (05/13/2024) is before the Last Successful As of Entry Moment (05/15/2024 3:00:00 AM) and the effective date (04/30/2024) is before the Last Successful Effective Date (05/15/2024).
Brian Hill’s change would have been processed in an earlier run (prior to May 1, 2024) if the integration was running incrementally before Run #1, as its effective date (04/30/2024) predates both runs’ baselines. Given the parameters provided, neither Run #1 nor Run #2 captures this change, makingD. Brian Hill will be excluded from both integration runsthe correct answer.
Workday Pro Integrations Study Guide References
Workday Integrations Study Guide: Core Connector: Worker– Section on "Incremental Processing" explains how changes are filtered based on entry moments and effective dates relative to the last successful run.
Workday Integrations Study Guide: Launch Parameters– Details how "Last Successful As of Entry Moment" and "Last Successful Effective Date" define the starting point for detecting new changes, excluding prior transactions.
Workday Integrations Study Guide: Change Detection– Notes that changes with effective dates before the last successful effective date are assumed processed in earlier runs and are skipped in incremental mode.
Refer to the following scenario to answer the question below.
You have been asked to build an integration using the Core Connector: Worker template and should leverage the Data Initialization Service (DIS). The integration will be used to export a full file (no change detection) for employees only and will include personal data.
What configuration is required to output the value of a calculated field which you created for inclusion in this integration?
Configure Integration Field Attributes.
Configure Integration Field Overrides.
Configure Integration Attributes.
Configure Integration Maps.
The scenario involves a Core Connector: Worker integration using the Data Initialization Service (DIS) to export a full file of employee personal data, with a requirement to include a calculated field in the output. Core Connectors rely on predefined field mappings, but custom calculated fields need specific configuration to be included. Let’s analyze the solution:
Requirement:Output the value of a calculated field created for this integration. In Workday, calculated fields are custom-built (e.g., using Report Writer or Calculated Fields) and not part of the standard Core Connector template, so they must be explicitly added to the output.
Integration Field Overrides:In Core Connectors,Integration Field Overridesallow you to replace a delivered field’s value or add a new field to the output by mapping it to a calculated field. This is the standard method to include custom calculated fields in the integration file. You create the calculated field separately,then use overrides to specify where its value appears in the output structure (e.g., as a new column or replacing an existing field).
Option Analysis:
A. Configure Integration Field Attributes: Incorrect. Integration Field Attributes refine how delivered fields are output (e.g., filtering multi-instance data like phone type), but they don’t support adding or mapping calculated fields.
B. Configure Integration Field Overrides: Correct. This configuration maps the calculated field to the output, ensuring its value is included in the exported file.
C. Configure Integration Attributes: Incorrect. Integration Attributes define integration-level settings (e.g., file name, delivery protocol), not field-specific outputs like calculated fields.
D. Configure Integration Maps: Incorrect. Integration Maps transform existing field values (e.g., "Married" to "M"), but they don’t add new fields or directly output calculated fields.
Implementation:
Create the calculated field in Workday (e.g., via Create Calculated Field task).
Edit the Core Connector: Worker integration.
Navigate to theIntegration Field Overridessection.
Add a new override, selecting the calculated field and specifying its output position (e.g., a new field ID or overriding an existing one).
Test the integration to confirm the calculated field value appears in the output file.
References from Workday Pro Integrations Study Guide:
Core Connectors & Document Transformation: Section on "Configuring Integration Field Overrides" explains how to include calculated fields in Core Connector outputs.
Integration System Fundamentals: Notes the use of overrides for custom data in predefined integration templates.
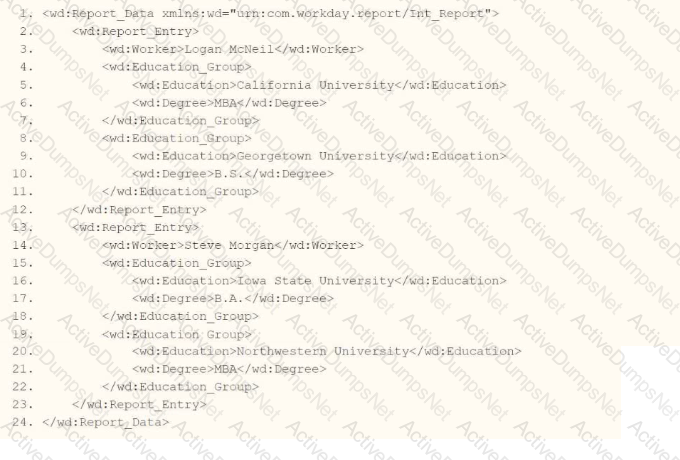
Refer to the following XML and example transformed output to answer the question below.
Example transformed wd:Report_Entry output;
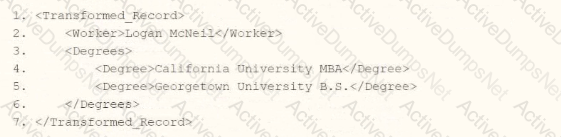
What is the XSLT syntax tor a template that matches onwd: Educationj3roup to produce the degree data in the above Transformed_Record example?

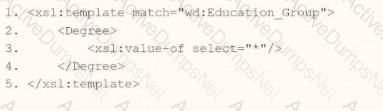

In Workday integrations, XSLT is used to transform XML data, such as the output from a web service-enabled report or EIB, into a desired format for third-party systems. In this scenario, you need to create an XSLT template that matches the wd:Education_Group element in the provided XML and transforms it to produce the degree data in the format shown in the Transformed_Record example. The goal is to output each degree (e.g., "California University MBA" and "Georgetown University B.S.") as a
Here’s why option A is correct:
Template Matching: The
Transformation Logic:
This approach ensures that each wd:Education_Group is transformed into a single
Context and Output: The template operates on each wd:Education_Group, producing the nested structure shown in the Transformed_Record (e.g.,
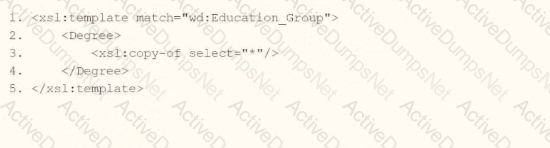
Why not the other options?
B.
xml
WrapCopy
This uses
C.
xml
WrapCopy
This uses
D.
xml
WrapCopy
This uses
To implement this in XSLT for a Workday integration:
Use the template from option A to match wd:Education_Group, apply
References:
Workday Pro Integrations Study Guide: Section on "XSLT Transformations for Workday Integrations" – Details the use of
Workday EIB and Web Services Guide: Chapter on "XML and XSLT for Report Data" – Explains the structure of Workday XML (e.g., wd:Education_Group, wd:Education, wd:Degree) and how to use XSLT to transform education data into a flattened format.
Workday Reporting and Analytics Guide: Section on "Web Service-Enabled Reports" – Covers integrating report outputs with XSLT for transformations, including examples of concatenating and restructuring data for third-party systems.
Refer to the following scenario to answer the question below.
You have configured a Core Connector: Worker integration, which utilizes the following basic configuration:
• Integration field attributes are configured to output the Position Title and Business Title fields from the Position Data section.
• Integration Population Eligibility uses the field Is Manager which returns true if the worker holds a manager role.
• Transaction Log service has been configured to Subscribe to specific Transaction Types: Position Edit Event.
You launch your integration with the following date launch parameters (Date format of MM/DD/YYYY):
• As of Entry Moment: 05/25/2024 12:00:00 AM • Effective Date: 05/25/2024
• Last Successful As of Entry Moment: 05/23/2024 12:00:00 AM
• Last Successful Effective Date: 05/23/2024
To test your integration, you made a change to a worker named Jared Ellis who is assigned to the manager role for the IT Help Desk department. You use the Change Business Title related action on Jared and update the Business Title of the position to a new value. Jared Ellis' worker history shows the Title Change Event as being successfully completed with an effective date of 05/24/2024 and an Entry Moment of 05/24/2024 07:58:53 AM however Jared Ellis does not show up in your output. What configuration element would have to be modified for the integration to include Jared Ellis in the output?
Transaction log subscription
Date launch parameters
Integration Field Attributes
Integration Population Eligibility
The scenario involves a Core Connector: Worker integration configured to output Position Title and Business Title fields for workers who meet the Integration Population Eligibility criteria (Is Manager = true), with the Transaction Log service subscribed to the "Position Edit Event." The integration is launched with specific date parameters, and a test is performed by updating Jared Ellis’ Business Title using the "Change Business Title" related action. Jared is a manager, and the change is logged with an effective date of 05/24/2024 and an entry moment of 05/24/2024 07:58:53 AM. Despite this, Jared does not appear in the output. Let’s determine why and identify the configuration element that needs modification.
In Workday, the Core Connector: Worker integration uses the Transaction Log service to detect changes based on subscribed transaction types. The subscribed transaction type in this case is "Position Edit Event," which is triggered when a position is edited via the "Edit Position" business process. However, the test scenario involves a "Change Business Title" related action, which is a distinct business process in Workday. This action updates the Business Title field but does not necessarily trigger a "Position Edit Event." Instead, it generates a different event type, such as a "Title Change Event" (as noted in Jared’s worker history), depending on how the system logs the action.
The date launch parameters provided are:
As of Entry Moment:05/25/2024 12:00:00 AM – The latest point for entry moments.
Effective Date:05/25/2024 – The latest effective date for changes.
Last Successful As of Entry Moment:05/23/2024 12:00:00 AM – The starting point for entry moments from the last run.
Last Successful Effective Date:05/23/2024 – The starting point for effective dates from the last run.
Jared’s change has:
Entry Moment:05/24/2024 07:58:53 AM – Falls between 05/23/2024 12:00:00 AM and 05/25/2024 12:00:00 AM.
Effective Date:05/24/2024 – Falls between 05/23/2024 and 05/25/2024.
The date parameters correctly cover the time window of Jared’s change, meaning the issue is not with the date range but with the event detection logic. The Transaction Log subscription determines which events are processed by the integration. Since the subscription is set to "Position Edit Event" and the change was made via "Change Business Title" (logged as a "Title Change Event"), the integration does not recognize this event because it is not subscribed to the appropriate transaction type.
To include Jared Ellis in the output, theTransaction Log subscriptionmust be modified to include the event type associated with the "Change Business Title" action, such as "Title Change Event" or a broader category like "Position Related Event" that encompasses both position edits and title changes. This ensures the integration captures the specific update made to Jared’s Business Title.
Let’s evaluate the other options:
B. Date launch parameters:The parameters already include Jared’s entry moment and effective date within the specified ranges (05/23/2024 to 05/25/2024). Adjusting these would not address the mismatch between the subscribed event type and the actual event triggered.
C. Integration Field Attributes:These are set to output Position Title and Business Title, and the change to Business Title is within scope. The field configuration is correct and does not need modification.
D. Integration Population Eligibility:This is set to "Is Manager = true," and Jared is a manager. This filter is functioning as intended and is not the issue.
The root cause is the Transaction Log subscription not aligning with the event type generated by the "Change Business Title" action, makingA. Transaction log subscriptionthe correct answer.
Workday Pro Integrations Study Guide References
Workday Integrations Study Guide: Core Connector: Worker– Section on "Transaction Log Configuration" explains how subscribing to specific transaction types filters the events processed by the integration.
Workday Integrations Study Guide: Change Detection– Details how different business processes (e.g., Edit Position vs. Change Business Title) generate distinct event types in the Transaction Log.
Workday Integrations Study Guide: Event Subscription– Notes the importance of aligning subscription types with the specific business actions being tested or monitored.
Refer to the following XML to answer the question below.
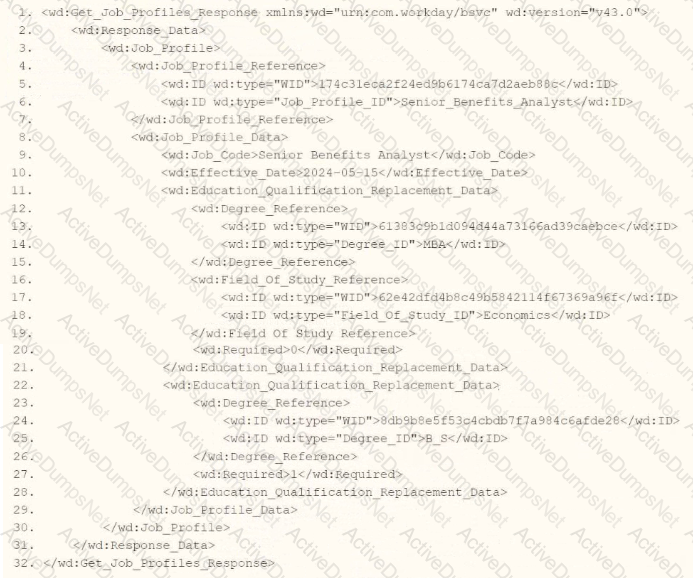
You are an integration developer and need to write XSLT to transform the output of an EIB which is making a request to the Get Job Profiles web service operation. The root template of your XSLT matches on the
wd:Job_Profile_Reference/wd:ID/wd:type='Job_Profile_ID'
wd:Job_Profile_Reference/wd:ID/@wd:type='Job_Profile_ID'
wd:Job_Profile_Reference/wd:ID[@wd:type='Job_Profile_ID']
wd:Job_Profile_Reference/wd:ID/[@wd:type='Job_Profile_ID']
As an integration developer working with Workday, you are tasked with transforming the output of an Enterprise Interface Builder (EIB) that calls the Get_Job_Profiles web service operation. The provided XML shows the response from this operation, and you need to write XSLT to select the value of the
Understanding the XML and Requirement
The XML snippet provided is a SOAP response from the Get_Job_Profiles web service operation in Workday, using the namespace xmlns:wd="urn:com.workday/bsvc" and version wd:version="v43.0". Key elements relevant to the question include:
The root element is
It contains
Within
The task is to select the value of the
Analysis of Options
Let’s evaluate each option based on the XML structure and XPath syntax rules:
Option A: wd:Job_Profile_Reference/wd:ID/wd:type='Job_Profile_ID'
This XPath attempts to navigate from wd:Job_Profile_Reference to wd:ID, then to wd:type='Job_Profile_ID'. However, there are several issues:
wd:type='Job_Profile_ID' is not valid XPath syntax. In XPath, to filter based on an attribute value, you use the attribute selector [@attribute='value'], not a direct comparison like wd:type='Job_Profile_ID'.
wd:type is an attribute of
This option is incorrect because it misuses XPath syntax for attribute filtering.
Option B: wd:Job_Profile_Reference/wd:ID/@wd:type='Job_Profile_ID'
This XPath navigates to wd:Job_Profile_Reference/wd:ID and then selects the @wd:type attribute, comparing it to "Job_Profile_ID" with =@wd:type='Job_Profile_ID'. However:
The =@wd:type='Job_Profile_ID' syntax is invalid in XPath. To filter based on an attribute value, you use [@wd:type='Job_Profile_ID'] as a predicate, not an equality comparison in this form.
This XPath would select the wd:type attribute itself (e.g., the string "Job_Profile_ID"), not the value of the
This option is incorrect due to the invalid syntax and inappropriate selection of the attribute instead of the element value.
Option C: wd:Job_Profile_Reference/wd:ID[@wd:type='Job_Profile_ID']
This XPath navigates from wd:Job_Profile_Reference to wd:ID and uses the predicate [@wd:type='Job_Profile_ID'] to filter for
In the XML,
The predicate [@wd:type='Job_Profile_ID'] selects the second
Since the template matches
When used with
This option is correct because it uses proper XPath syntax for attribute-based filtering and selects the desired
Option D: wd:Job_Profile_Reference/wd:ID/[@wd:type='Job_Profile_ID']
This XPath is similar to Option C but includes an extra forward slash before the predicate: wd:ID/[@wd:type='Job_Profile_ID']. In XPath, predicates like [@attribute='value'] are used directly after the node name (e.g., wd:ID[@wd:type='Job_Profile_ID']), not separated by a slash. The extra slash is syntactically incorrect and would result in an error or no match, as it implies navigating to a child node that doesn’t exist.
This option is incorrect due to the invalid syntax.
Why Option C is Correct
Option C, wd:Job_Profile_Reference/wd:ID[@wd:type='Job_Profile_ID'], is the correct XPath syntax because:
It starts from the context node
It correctly selects the value "Senior_Benefits_Analyst," which is the content of the
It uses standard XPath syntax for attribute-based filtering, aligning with Workday’s XSLT implementation for web service responses.
When used with
Practical Example in XSLT
Here’s how this might look in your XSLT:
This would output "Senior_Benefits_Analyst" for the
Verification with Workday Documentation
The Workday Pro Integrations Study Guide and SOAP API Reference (available via Workday Community) detail the structure of the Get_Job_Profiles response and how to use XPath in XSLT for transformations. The XML structure shows
Workday Pro Integrations Study Guide References
Section: XSLT Transformations in EIBs– Describes using XSLT to transform web service responses, including selecting elements with XPath and attribute predicates.
Section: Workday Web Services– Details the Get_Job_Profiles operation and its XML output structure, including
Section: XPath Syntax– Explains how to use predicates like [@wd:type='Job_Profile_ID'] for attribute-based filtering in Workday XSLT.
Workday Community SOAP API Reference – Provides examples of XPath navigation for Workday web service responses, including attribute selection.
Option C is the verified answer, as it correctly selects the
You need to create a report that includes data from multiple business objects. For a supervisory organization specified at run time, the report must output one row per worker, their active benefit plans, and the names and ages of all related dependents. The Worker business object contains the Employee, Benefit Plans, and Dependents fields. The Dependent business object contains the employee's dependent's Name and Age fields.
How would you select the primary business object (PBO) and related business objects (RBO) for the report?
PBO: Dependent, RBO: Worker
PBO: Worker, RBO: Dependent
PBO: Dependent, no RBOs
PBO: Worker; no RBOs
In Workday reporting, selecting the appropriatePrimary Business Object (PBO)andRelated Business Objects (RBOs)is critical to ensure that the report retrieves and organizes data correctly based on the requirements. The requirement here is to create a report that outputs one row per worker for a specified supervisory organization, including their active benefit plans and the names and ages of all related dependents. The Worker business object contains fields like Employee, Benefit Plans, and Dependents, while the Dependent business object provides the Name and Age fields for dependents.
Why Worker as the PBO?The report needs to output "one row per worker," making the Worker business object the natural choice for the PBO. In Workday, the PBO defines the primary dataset and determines the granularity of the report (i.e., one row per instance of the PBO). Since the report revolves around workers and their associated data (benefit plans and dependents), Worker is the starting point. Additionally, the requirement specifies a supervisory organization at runtime, which is a filter applied to the Worker business object to limit the population.
Why Dependent as an RBO?The Worker business object includes a "Dependents" field, which is a multi-instance field linking to the Dependent business object. To access detailed dependent data (Name and Age), the Dependent business object must be added as an RBO. This allows the report to pull in the related dependent information for each worker. Without the Dependent RBO, the report could only reference the existence of dependents, not their specific attributes like Name and Age.
Analysis of Benefit Plans:The Worker business object already contains the "Benefit Plans" field, which provides access to active benefit plan data. Since this is a field directly available on the PBO (Worker), no additional RBO is needed to retrieve benefit plan information.
Option Analysis:
A. PBO: Dependent, RBO: Worker: Incorrect. If Dependent were the PBO, the report would output one row per dependent, not one row per worker, which contradicts the requirement. Additionally, Worker as an RBO would unnecessarily complicate accessing worker-level data.
B. PBO: Worker, RBO: Dependent: Correct. This aligns with the requirement: Worker as the PBO ensures one row per worker, and Dependent as the RBO provides access to dependent details (Name and Age). Benefit Plans are already accessible via the Worker PBO.
C. PBO: Dependent, no RBOs: Incorrect.This would result in one row per dependent and would not allow easy access to worker or benefit plan data, failing to meet the "one row per worker" requirement.
D. PBO: Worker, no RBOs: Incorrect. While Worker as the PBO is appropriate, omitting the Dependent RBO prevents the report from retrieving dependent Name and Age fields, which are stored in the Dependent business object, not directly on Worker.
Implementation:
Create a custom report withWorkeras the PBO.
Add a filter for the supervisory organization (specified at runtime) on the Worker PBO.
AddDependentas an RBO to access Name and Age fields.
Include columns from Worker (e.g., Employee, Benefit Plans) and Dependent (e.g., Name, Age).
References from Workday Pro Integrations Study Guide:
Workday Report Writer Fundamentals: Section on "Selecting Primary and Related Business Objects" explains how the PBO determines the report’s row structure and RBOs extend data access to related objects.
Integration System Fundamentals: Discusses how multi-instance fields (e.g., Dependents on Worker) require RBOs to retrieve detailed attributes.
Refer to the following scenario to answer the question below.
You have been asked to build an integration using the Core Connector: Worker template and should leverage the Data Initialization Service (DIS). The integration will be used to export a full file (no change detection) for employees only and will include personal data.
What configuration is required to ensure that when outputting phone number only the home phone number is included in the output?
Configure an integration map to map the phone type.
Include the phone type integration field attribute.
Configure the phone type integration attribute.
Configure an integration field override to include phone type.
The scenario involves a Core Connector: Worker integration using DIS to export a full file of employee personal data, with the requirement to output only the home phone number when including phone data. Workday’s "Phone Number" field is multi-instance, meaning a worker can have multiple phone types (e.g., Home, Work, Mobile). Let’s determine the configuration:
Requirement:Filter the multi-instance "Phone Number" field to include only the "Home" phone number in the output file. This involves specifying which instance of the phone data to extract.
Integration Field Attributes:In Core Connectors,Integration Field Attributesallow you to refine how multi-instance fields are handled in the output. For the "Phone Number" field, you can set an attribute like "PhoneType" to "Home" to ensure only home phone numbers are included. This is a field-level configuration that filters instances without requiring a calculated field or override.
Option Analysis:
A. Configure an integration map to map the phone type: Incorrect. Integration Maps transform field values (e.g., "United States" to "USA"), not filter multi-instance data like selecting a specific phone type.
B. Include the phone type integration field attribute: Correct. This configures the "Phone Number" field to output only instances where the phone type is "Home," directly meeting the requirement.
C. Configure the phone type integration attribute: Incorrect. "Integration attribute" refers to integration-level settings (e.g., file format), not field-specific configurations. The correct term is "integration field attribute."
D. Configure an integration field override to include phone type: Incorrect. Integration Field Overrides are used to replace a field’s value with a calculated field or custom value, not to filter multi-instance data like phone type.
Implementation:
Edit the Core Connector: Worker integration.
Navigate to theIntegration Field Attributessection for the "Phone Number" field.
Set the "Phone Type" attribute to "Home" (or equivalent reference ID for Home phone).
Test the output file to confirm only home phone numbers are included.
References from Workday Pro Integrations Study Guide:
Core Connectors & Document Transformation: Section on "Integration Field Attributes" explains filtering multi-instance fields like phone numbers by type.
Integration System Fundamentals: Notes how Core Connectors handle multi-instance data with field-level attributes.
What is the relationship between an ISU (Integration System User) and an ISSG (Integration System Security Group)?
The ISU is a member of the ISSG.
The ISU owns the ISSG.
The ISU grants security policies to the ISSG.
The ISU controls what accounts are in the ISSG.
This question explores the relationship between an Integration System User (ISU) and an Integration System Security Group (ISSG) in Workday Pro Integrations, focusing on how security is structured for integrations. Let’s analyze the relationship and evaluate each option to determine the correct answer.
Understanding ISU and ISSG in Workday
Integration System User (ISU):An ISU is a dedicated user account in Workday specifically designed for integrations. It acts as a "robot account" or service account, used by integration systems to interact with Workday via APIs, web services, or other integration mechanisms (e.g., EIBs, Core Connectors). ISUs are typically configured with a username, password, and specific security settings, such as disabling UI sessions and setting session timeouts to prevent expiration (commonly set to 0 minutes). ISUs are not human users but are instead programmatic accounts for automated processes.
Integration System Security Group (ISSG):An ISSG is a security container or group in Workday that defines the permissions and access rights for integration systems. ISSGs are used to manage what data and functionalities an integration (or its associated ISU) can access or modify within Workday. There are two types of ISSGs:
Unconstrained:Allows access to all data instances secured by the group.
Constrained:Limits access to a subset of data instances based on context (e.g., specific segments or data scopes).ISSGs are configured with domain security policies, granting permissions like "Get" (read), "Put" (write), "View," or "Modify" for specific domains (e.g., Worker Data, Integration Build).
Relationship Between ISU and ISSG:In Workday, security for integrations is managed through a hierarchical structure. An ISU is associated with or assigned to an ISSG to inherit its permissions. The ISSG acts as the security policy container, defining what the ISU can do, while the ISU is the account executing those actions. This relationship ensures that integrations have controlled, audited access to Workday data and functions, adhering to the principle of least privilege.
Evaluating Each Option
Let’s assess each option based on Workday’s security model for integrations:
Option A: The ISU is a member of the ISSG.
Analysis:This is correct. In Workday, an ISU is assigned to or associated with an ISSG to gain the necessary permissions. The ISSG serves as a security group that contains one or more ISUs, granting them access to specific domains and functionalities. For example, when creating an ISU, you use the "Create Integration System User" task, and then assign it to an ISSG via the "Assign Integration System Security Groups" or "Maintain Permissions for Security Group" tasks. Multiple ISUs can belong to the same ISSG, inheriting its permissions. This aligns with Workday’s security framework, where security groups (like ISSGs) manage user (or ISU) access.
Why It Fits:The ISU is a "member" of the ISSG in the sense that it is linked to the group to receive its permissions, enabling secure integration operations. This is a standard practice for managing integration security in Workday.
Option B: The ISU owns the ISSG.
Analysis:This is incorrect. In Workday, ISUs do not "own" ISSGs. Ownership or control of security groups is not a concept applicable to ISUs, which are service accounts for integrations, not administrative entities with authority over security structures. ISSGs are created and managed by Workday administrators or security professionals using tasks like "Create Security Group" and "Maintain Permissions for Security Group." The ISU is simply a user account assigned to the ISSG, not its owner or controller.
Why It Doesn’t Fit:Ownership implies administrative control, which ISUs lack; they are designed for execution, not management of security groups.
Option C: The ISU grants security policies to the ISSG.
Analysis:This is incorrect. ISUs do not have the authority to grant or modify security policies for ISSGs. Security policies are defined and assigned to ISSGs by Workday administrators or security roles with appropriate permissions (e.g., Security Configuration domain access). ISUs are passive accounts that execute integrations based on the permissions granted by the ISSG they are assigned to. Granting permissions is an administrative function, not an ISU capability.
Why It Doesn’t Fit:ISUs are integration accounts, not security administrators, so they cannot modify or grant policies to ISSGs.
Option D: The ISU controls what accounts are in the ISSG.
Analysis:This is incorrect. ISUs do not control membership or configuration of ISSGs. Adding or removing accounts (including other ISUs) from an ISSG is an administrative task performed by users with security configuration permissions, using tasks like "Maintain Permissions for Security Group." ISUs are limited to executing integration tasks based on their assigned ISSG permissions, not managing group membership.
Why It Doesn’t Fit:ISUs lack the authority to manage ISSG membership or structure, as they are not administrative accounts but integration-specific service accounts.
Final Verification
Based on Workday’s security model, the correct relationship is that an ISU is a member of an ISSG, inheriting its permissions to perform integration tasks. This is consistent with the principle of least privilege, where ISSGs define access, and ISUs execute within those boundaries. The other options misattribute administrative or ownership roles to ISUs, which are not supported by Workday’s design.
Supporting Information
The relationship is grounded in Workday’s integration security practices, including:
Creating an ISU via the "Create Integration System User" task.
Creating an ISSG via the "Create Security Group" task, selecting "Integration System Security Group (Unconstrained)" or "Constrained."
Assigning the ISU to the ISSG using tasks like "Assign Integration System Security Groups" or "Maintain Permissions for Security Group."
Configuring domain security policies (e.g., Get, Put) for the ISSG to control ISU access to domains like Worker Data, Integration Build, etc.
Activating security changes via "Activate Pending Security Policy Changes."
This structure ensures secure, controlled access for integrations, with ISSGs acting as the permission container and ISUs as the executing accounts.
Key References
The explanation aligns with Workday Pro Integrations documentation and best practices, including:
Integration security overviews and training on Workday Community.
Guides for creating ISUs and ISSGs in implementation documentation (e.g., NetIQ, Microsoft Learn, Reco.ai).
Tutorials on configuring domain permissions and security groups for integrations (e.g., ServiceNow, Apideck, Surety Systems).
A calculated field used as a field override in a Connector is not appearing in the output. Assuming the field has a value, what could cause this to occur?
Access not provided to calculated field data source.
Access not provided to all fields in the calculated field.
Access not provided to Connector calculated field web service.
Access not provided to all instances of calculated field.
This question addresses a troubleshooting scenario in Workday Pro Integrations, where a calculated field used as a field override in a Connector does not appear in the output, despite having a value. Let’s analyze the potential causes and evaluate each option.
Understanding Calculated Fields and Connectors in Workday
Calculated Fields:In Workday, calculated fields are custom fields created using Workday’s expression language to derive values based on other fields, conditions, or functions. They are often used in reports, integrations, and business processes to transform or aggregate data. Calculated fields can reference other fields (data sources) and require appropriate security permissions to access those underlying fields.
Field Override in Connectors:In a Core Connector or other integration system, a field override allows you to replace or supplement a default field with a custom value, such as a calculated field. This is configured in the integration’s mapping or transformation steps, ensuring the output includes the desired data. However, for the calculated field to appear in the output, it must be accessible, have a valid value, and be properly configured in the integration.
Issue: Calculated Field Not Appearing in Output:If the calculated field has a value but doesn’t appear in the Connector’s output, the issue likely relates to security, configuration, or access restrictions. The question assumes the field has a value, so we focus on permissions or setup errors rather than data issues.
Evaluating Each Option
Let’s assess each option based on Workday’s integration and security model:
Option A: Access not provided to calculated field data source.
Analysis:This is partially related but incorrect as the primary cause. Calculated fields often rely on underlying data sources (e.g., worker data, organization data) to compute their values. If access to the data source is restricted, the calculated field might not compute correctly or appear in the output. However, the question specifies the field has a value, implying the data source is accessible. The more specific issue is likely access to the individual fields within the calculated field’s expression, not just the broader data source.
Why It Doesn’t Fit:While data source access is important, it’s too general here. The calculated field’s value exists, suggesting the data source is accessible, but the problem lies in finer-grained permissions for the fields used in the calculation.
Option B: Access not provided to all fields in the calculated field.
Analysis:This is correct. Calculated fields in Workday are expressions that reference one or more fields (e.g., Worker_ID + Position_Title). For the calculated field to be used in a Connector’s output, the ISU (via its ISSG) must have access to all fields referenced in the calculation. If any field lacks "Get" or "View" permission in the relevant domain (e.g., Worker Data), the calculated field won’t appear in the output, even if it has a value. This is a common security issue in integrations, as ISSGs must be configured with domain access for every field involved.
Why It Fits:Workday’s security model requires granular permissions. For example, if a calculated field combines Worker_Name and Hire_Date, the ISU needs access to both fields’ domains. If Hire_Date is restricted, the calculated field fails to output, even with a value. This aligns with the scenario and is a frequent troubleshooting point in Workday Pro Integrations.
Option C: Access not provided to Connector calculated field web service.
Analysis:This is incorrect. There isn’t a specific "Connector calculated field web service" in Workday. Calculated fields are part of the integration’s configuration, not a separate web service. The web service operation used by the Connector (e.g., Get_Workers) must have permissions, but this relates to the overall integration, not the calculated field specifically. The issue here is field-level access, not a web service restriction.
Why It Doesn’t Fit:This option misinterprets Workday’s architecture. Calculated fields are configured within the integration, not as standalone web services, making this irrelevant to the problem.
Option D: Access not provided to all instances of calculated field.
Analysis:This is incorrect. The concept of "instances" typically applies to data records (e.g., all worker records), not calculated fields themselves. Calculated fields are expressions, not data instances, so there’s no need for "instance-level" access. The issue is about field-level permissions within the calculated field’s expression, not instances of the field. This option misunderstands Workday’s security model for calculated fields.
Why It Doesn’t Fit:Calculated fields don’t have "instances" requiring separate access; they depend on the fields they reference, making this option inaccurate.
Final Verification
The correct answer is Option B, as the calculated field’s absence in the output is likely due to the ISU lacking access to all fields referenced in the calculated field’s expression. For example, if the calculated field in a Core Connector: Worker Data combines Worker_ID and Department_Name, the ISSG must have "Get" access to both the Worker Data and Organization Data domains. If Department_Name is restricted, the calculated field won’t output, even with a value. This is a common security configuration issue in Workday integrations, addressed by reviewing and adjusting ISSG domain permissions.
This aligns with Workday’s security model, where granular permissions are required for all data elements, as seen in Questions 26 and 28. The assumption that the field has a value rules out data or configuration errors, focusing on security as the cause.
Supporting Documentation
The reasoning is based on:
Workday Community documentation on calculated fields, security domains, and integration mappings.
Tutorials on configuring Connectors and troubleshooting, such asWorkday Advanced Studio Tutorial, highlighting field access issues.
Integration security guides from partners (e.g., NetIQ, Microsoft Learn, Reco.ai) detailing ISSG permissions for fields in calculated expressions.
Community discussions on Reddit and Workday forums on calculated field troubleshooting (r/workday on Reddit).
Refer to the following XML to answer the question below.

You are an integration developer and need to write XSLT to transform the output of an EIB which is making a request to the Get Job Profiles web service operation. The root template of your XSLT matches on the
What XPath syntax would be used to select the value of the wd:Job_Code element when the
wd:Job_Profile/wd:Job_Profile_Data/wd:Job_Code
wd:Job_Profile_Data[@wd:Job_Code]
wd:Job_Profile_Data/wd:Job_Code
wd:Job_Profile_Reference/wd:ID[@wd:type='Job_Profile_ID']
As an integration developer working with Workday, you are tasked with transforming the output of an Enterprise Interface Builder (EIB) that calls the Get_Job_Profiles web service operation. The provided XML shows the response from this operation, and you need to write XSLT to select the value of the
Understanding the XML and Requirement
The XML snippet provided is a SOAP response from the Get_Job_Profiles web service operation in Workday, using the namespace xmlns:wd="urn:com.workday/bsvc" and version wd:version="v43.0". Key elements relevant to the question include:
The root element is
It contains
Within
The task is to select the value of
Analysis of Options
Let’s evaluate each option based on the XML structure and XPath syntax rules:
Option A: wd:Job_Profile/wd:Job_Profile_Data/wd:Job_Code
This XPath starts from wd:Job_Profile and navigates to wd:Job_Profile_Data/wd:Job_Code. However, in the XML,
However, since the template matches
Option B: wd:Job_Profile_Data[@wd:Job_Code]
This XPath uses an attribute selector ([@wd:Job_Code]) to filter
Option C: wd:Job_Profile_Data/wd:Job_Code
This XPath starts from wd:Job_Profile_Data (a direct child of
Concise and appropriate for the context.
Directly selects the value "Senior_Benefits_Analyst" when used with
Matches the XML structure, as
This is the most straightforward and correct option for selecting the
Option D: wd:Job_Profile_Reference/wd:ID[@wd:type='Job_Profile_ID']
This XPath navigates to
The XPath wd:Job_Profile_Reference/wd:ID[@wd:type='Job_Profile_ID'] selects the
Why Option C is Correct
Option C, wd:Job_Profile_Data/wd:Job_Code, is the correct XPath syntax because:
It starts from the context node
It is concise and aligns with standard XPath navigation in XSLT, avoiding unnecessary redundancy (unlike Option A) or incorrect attribute selectors (unlike Option B).
It matches the XML structure, where
When used with
Practical Example in XSLT
Here’s how this might look in your XSLT:
xml
WrapCopy
This would output "Senior_Benefits_Analyst" for the
Verification with Workday Documentation
The Workday Pro Integrations Study Guide and SOAP API Reference (available via Workday Community) detail the structure of the Get_Job_Profiles response and how to use XPath in XSLT for transformations. The XML structure shows
Workday Pro Integrations Study Guide References
Section: XSLT Transformations in EIBs– Describes using XSLT to transform web service responses, including selecting elements with XPath.
Section: Workday Web Services– Details the Get_Job_Profiles operation and its XML output structure, including
Section: XPath Syntax– Explains how to navigate XML hierarchies in Workday XSLT, using relative paths like wd:Job_Profile_Data/wd:Job_Code from a
Workday Community SOAP API Reference – Provides examples of XPath navigation for Workday web service responses.
Option C is the verified answer, as it correctly selects the
You are configuring integration security for a Core Connector integration system. How do you find the web service operation used by the connector template?
It is displayed when selecting a Core Connector Template to build an integration system
Run the integration system and view the web service request in the messages audit
View the SOAP API Reference on Workday Community
Run the Integration Template Catalog report in the tenant
When setting up security for a Core Connector integration system in Workday, you need to know which web service operation the connector template uses. The best way is to run the "Integration Template Catalog report" within your Workday tenant. This report lists all integration templates and should include details about the web service operations they use, making it easy to configure security.
Why This Matters
This method is efficient because it lets you find the information before running the system, which is crucial for setting up permissions correctly. It's surprising that such a specific report exists, as it simplifies a task that could otherwise involve running the system or guessing from API references.
How It Works
Select the report in your Workday tenant to see a list of all Core Connector templates.
Look for the template you're using and find the associated web service operation listed in the report.
Use this information to set up the right security permissions for your integration.
For more details, check out resources likeWorkday Core ConnectorsorWorkday Integrations.
What is the limitation when assigning ISUs to integration systems?
An ISU can be assigned to five integration systems.
An ISU can be assigned to an unlimited number of integration systems.
An ISU can be assigned to only one integration system.
An ISU can only be assigned to an ISSG and not an integration system.
This question examines the limitations on assigning Integration System Users (ISUs) to integration systems in Workday Pro Integrations. Let’s analyze the relationship and evaluate each option to determine the correct answer.
Understanding ISUs and Integration Systems in Workday
Integration System User (ISU):An ISU is a specialized user account in Workday designed for integrations, functioning as a service account to authenticate and execute integration processes. ISUs are created using the "Create Integration System User" task and are typically configured with settings like disabling UI sessions and setting long session timeouts (e.g., 0 minutes) toprevent expiration during automated processes. ISUs are not human users but are instead programmatic accounts used for API calls, EIBs, Core Connectors, or other integration mechanisms.
Integration Systems:In Workday, an "integration system" refers to the configuration or setup of an integration, such as an External Integration Business (EIB), Core Connector, or custom integration via web services. Integration systems are defined to handle data exchange between Workday and external systems, and they require authentication, often via an ISU, to execute tasks like data retrieval, transformation, or posting.
Assigning ISUs to Integration Systems:ISUs are used to authenticate and authorize integration systems to interact with Workday. When configuring an integration system, you assign an ISU to provide the credentials needed for the integration to run. This assignment ensures that the integration can access Workday data and functionalities based on the security permissions granted to the ISU via its associated Integration System Security Group (ISSG).
Limitation on Assignment:Workday’s security model imposes restrictions to maintain control and auditability. Specifically, an ISU is designed to be tied to a single integration system to ensure clear accountability, prevent conflicts, and simplify security management. This limitation prevents an ISU from being reused across multiple unrelated integration systems, reducing the risk of unintended access or data leakage.
Evaluating Each Option
Let’s assess each option based on Workday’s integration and security practices:
Option A: An ISU can be assigned to five integration systems.
Analysis:This is incorrect. Workday does not impose a specific numerical limit like "five" for ISU assignments to integration systems. Instead, the limitation is more restrictive: an ISU is typically assigned to only one integration system to ensure focused security and accountability. Allowing an ISU to serve multiple systems could lead to confusion, overlapping permissions, or security risks, which Workday’s design avoids.
Why It Doesn’t Fit:There’s no documentation or standard practice in Workday Pro Integrations suggesting a limit of five integration systems per ISU. This option is arbitrary and inconsistent with Workday’s security model.
Option B: An ISU can be assigned to an unlimited number of integration systems.
Analysis:This is incorrect. Workday’s security best practices do not allow an ISU to be assigned to an unlimited number of integration systems. Allowing this would create security vulnerabilities, as an ISU’s permissions (via its ISSG) could be applied across multiple unrelated systems, potentially leading to unauthorized access or data conflicts. Workday enforces a one-to-one or tightly controlled relationship to maintain auditability and security.
Why It Doesn’t Fit:The principle of least privilege and clear accountability in Workday integrations requires limiting an ISU’s scope, not allowing unlimited assignments.
Option C: An ISU can be assigned to only one integration system.
Analysis:This is correct. In Workday, an ISU is typically assigned to a single integration system to ensure that its credentials and permissions are tightly scoped. This aligns with Workday’s security model, where ISUs are created for specific integration purposes (e.g., an EIB, Core Connector, or web service integration). When configuring an integration system, you specify the ISU in the integration setup (e.g., under "Integration System Attributes" or "Authentication" settings), and it is not reused across multiple systems to prevent conflicts or unintended access. This limitation ensures traceability and security, as the ISU’s actions can be audited within the context of that single integration.
Why It Fits:Workday documentation and best practices, including training materials and community forums, emphasize that ISUs are dedicated to specific integrations. For example, when creating an EIB or Core Connector, you assign an ISU, and it is not shared across other integrations unless explicitly reconfigured, which is rare and discouraged for security reasons.
Option D: An ISU can only be assigned to an ISSG and not an integration system.
Analysis:This is incorrect. While ISUs are indeed assigned to ISSGs to inherit security permissions (as established in Question 26), they are also assigned to integration systems toprovide authentication and authorization for executing integration tasks. The ISU’s role includes both: it belongs to an ISSG for permissions and is linked to an integration system for execution. Saying it can only be assigned to an ISSG and not an integration system misrepresents Workday’s design, as ISUs are explicitly configured in integration systems (e.g., EIB, Core Connector) to run processes.
Why It Doesn’t Fit:ISUs are integral to integration systems, providing credentials for API calls or data exchange. Excluding assignment to integration systems contradicts Workday’s integration framework.
Final Verification
The correct answer is Option C, as Workday limits an ISU to a single integration system to ensure security, accountability, and clarity in integration operations. This aligns with the principle of least privilege, where ISUs are scoped narrowly to avoid overexposure. For example, when setting up a Core Connector: Job Postings (as in Question 25), you assign an ISU specifically for that integration, not multiple ones, unless reconfiguring for a different purpose, which is atypical.
Supporting Documentation
The reasoning is based on Workday Pro Integrations security practices, including:
Workday Community documentation on creating and managing ISUs and integration systems.
Tutorials on configuring EIBs, Core Connectors, and web services, which show assigning ISUs to specific integrations (e.g.,Workday Advanced Studio Tutorial).
Integration security overviews from implementation partners (e.g., NetIQ, Microsoft Learn, Reco.ai) emphasizing one ISU per integration for security.
Community discussions on Reddit and Workday forums reinforcing that ISUs are tied to single integrations for auditability (r/workday on Reddit).
What option for an outbound EIB uses a Workday-delivered transformation to output a format other than Workday XML?
Alternate Output Format
XSLT Attachment Transformation
Custom Transformation
Custom Report Transformation
Overview
For an outbound Enterprise Interface Builder (EIB) in Workday, the option that uses a Workday-delivered transformation to output a format other than Workday XML isAlternate Output Format. This allows you to select formats like CSV, which Workday handles without needing custom coding.
How It Works
When setting up an outbound EIB, you can use a custom report as the data source. By choosing an alternate output format, such as CSV, Workday automatically transforms the data into that format. This is surprising because it simplifies the process, requiring no additional user effort for transformation.
Why Not the Others?
XSL Attachment Transformation (B): This requires you to provide your own XSL file, making it a custom transformation, not delivered by Workday.
Custom Transformation (C): This is clearly user-defined, not Workday-delivered.
Custom Report Transformation (D): This also involves user customization, typically through XSL, and isn't a pre-built Workday option.
Comprehensive Analysis
This section provides a detailed examination of Workday's Enterprise Interface Builder (EIB) transformation options, focusing on outbound integrations and the specific question of identifying the option that uses a Workday-delivered transformation to output a format other than Workday XML. We will explore the functionality, configuration, and implications of each option, ensuring a thorough understanding based on available documentation and resources.
Understanding Workday EIB and Outbound Integrations
Workday EIB is a no-code, graphical interface tool designed for both inbound and outbound integrations, facilitating the exchange of data between Workday and external systems. For outbound EIBs, the process involves extracting data from Workday (typically via a custom report) and delivering itto an external endpoint, such as via SFTP, email, or other protocols. The integration process consists of three key steps: Get Data, Transform, and Deliver.
Get Data: Specifies the data source, often a Workday custom report, which must be web service-enabled for EIB use.
Transform: Optionally transforms the data into a format suitable for the external system, using various transformation types.
Deliver: Defines the method and destination for sending the transformed data.
The question focuses on the Transform step, seeking an option that uses a Workday-delivered transformation to output a format other than Workday XML, which is typically the default format for Workday data exchanges.
Analyzing the Options
Let's evaluate each option provided in the question to determine which fits the criteria:
Alternate Output Format (A)
Description: This option is available when configuring the Get Data step, specifically when using a custom report as the data source. It allows selecting an alternate output format, such as CSV, Excel, or other supported formats, instead of the default Workday XML.
Functionality: When selected, Workday handles the transformation of the report data into the chosen format. For example, setting the alternate output format to CSV means the EIB will deliver a CSV file, and this transformation is performed by Workday without requiring the user to define additional transformation logic.
Workday-Delivered: Yes, as the transformation to the alternate format (e.g., CSV) is part of Workday's report generation capabilities, not requiring custom coding or user-provided files.
Output Format Other Than Workday XML: Yes, formats like CSV are distinct from Workday XML, fulfilling the requirement.
From resources likeWorkday HCM features | Workday EIB, it's noted that custom reports can use CSV as an alternate output format, and this is managed by Workday, supporting our conclusion.
XSL Attachment Transformation (B)
Description: This involves attaching an XSL (Extensible Stylesheet Language) file to the EIB for transforming the data, typically from XML to another format like CSV or a custom structure.
Functionality: The user must create or provide the XSL file, which defines how the data is transformed. This is used in the Transform step to manipulate the XML output from the Get Data step.
Workday-Delivered: No, as the XSL file is custom-created by the user. Resources liker/workday on Reddit: EIB xslt Transformationdiscuss users working on XSL transformations, indicating they are user-defined, not pre-built by Workday.
Output Format Other Than Workday XML: Yes, it can output formats like CSV, but it's not Workday-delivered, so it doesn't meet the criteria.
Custom Transformation (C)
Description: This option allows users to define their own transformation logic, often through scripting or other custom methods, to convert the data into the desired format.
Functionality: It is a user-defined transformation, typically used for complex scenarios where standard options are insufficient.
Workday-Delivered: No, as it explicitly states "custom," meaning it's not provided by Workday.
Output Format Other Than Workday XML: Yes, it can output various formats, but again, it's not Workday-delivered, so it doesn't fit.
Custom Report Transformation (D)
Description: This might refer to transformations specifically related to custom reports, potentially involving user-defined logic to manipulate the report data.
Functionality: From resources likeSpark Databox - using custom report transformation, it involves using custom XSL transformations, indicating user involvement. It seems to be a subset of custom transformations, focusing on report data.
Workday-Delivered: No, as it involves custom XSL, which is user-provided, not pre-built by Workday.
Output Format Other Than Workday XML: Yes, it can output formats like pipe-delimited files, but it's not Workday-delivered, so it doesn't meet the criteria.
This is the XML file generated from a Core Connector; Positions integration.

When performing an XSLT Transformation on the Core Connector: Positions XML output file, you want to show a hyperlink of positions that are not available for hiring as an entry in the Message tab.
What are all the needed ETV items to meet the above requirements?


In Workday integrations, the Extension for Transformation and Validation (ETV) framework is used within XSLT transformations to apply validation and formatting rules to XML data, such as the output from a Core Connector (e.g., Positions integration). In this scenario, you need to perform an XSLT transformation on the Core Connector: Positions XML output file to display a hyperlink for positions that are not available for hiring as an entry in the Message tab. This requires configuring ETV attributes to ensure the data is present and correctly targeted for the hyperlink.
Here’s why option B is correct:
Requirement Analysis: The requirement specifies showing a hyperlink for positions "not available for hiring." In the provided XML, the ps:Available_For_Hire field under ps:Position_Data indicates whether a position is available for hire (e.g.,
ETV Attributes:
etv:required="true": This ensures that the ps:WID value under ps:Additional_Information is mandatory for the transformation. If the WID is missing, the transformation will fail or generate an error, ensuring that the hyperlink can be created only for valid positions with an associated WID.
etv:target="[ps:Additional_Information/ps:WID]": This specifies that the target of the transformation (e.g., the hyperlink) should be the WID value found at ps:Additional_Information/ps:WID in the XML. This WID can be used to construct a hyperlink to the position in Workday, meeting the requirement to show a hyperlink for positions not available for hiring.
Context in XML: The XML shows ps:Additional_Information containing ps:WID (e.g.,
Why not the other options?
A.
etv:minLength="0"
etv:targetWID="[ps:Additional_Information/ps:WID]"
etv:minLength="0" allows the WID to be empty or have zero length, which contradicts the need for a valid WID to create a hyperlink. It does not ensure the data is present, making it unsuitable. Additionally, etv:targetWID is not a standard ETV attribute; the correct attribute is etv:target, making this option incorrect.
C.
etv:minLength="0"
etv:target="[ps:Additional_Information/ps:WID]"
Similar to option A, etv:minLength="0" allows the WID to be empty, which does not meet the requirement for a mandatory WID to create a hyperlink. This makes it incorrect, as the hyperlink would fail if the WID is missing.
D.
etv:required="true"
etv:targetWID="[ps:Additional_Information/ps:WID]"
While etv:required="true" ensures the WID is present, etv:targetWID is not a standard ETV attribute. The correct attribute is etv:target, making this option syntactically incorrect and unsuitable for the transformation.
To implement this in XSLT for a Workday integration:
Use the ETV attributes from option B (etv:required="true" and etv:target="[ps:Additional_Information/ps:WID]") within your XSLT template to validate and target the ps:WID for positions where ps:Available_For_Hire is false. This ensures the transformation generates a valid hyperlink in the Message tab, linking to the position’s WID in Workday.
References:
Workday Pro Integrations Study Guide: Section on "ETV in XSLT Transformations" – Details the use of ETV attributes like required and target for validating and targeting data in Workday XML, including handling identifiers like WID for hyperlinks.
Workday Core Connector and EIB Guide: Chapter on "XML Transformations" – Explains how to use ETV attributes in XSLT to process position data, including creating messages or hyperlinks based on conditions like Available_For_Hire.
Workday Integration System Fundamentals: Section on "ETV for Message Generation" – Covers applying ETV attributes to generate hyperlinks in the Message tab, ensuring data integrity and correct targeting of Workday identifiers like WID.
What is the workflow to upload an XSLT file for a brand new Document Transformation system?
Configure XSLT Attachment Transformation, then Create Integration Attachment Service
Create XSLT Attachment Transformation, then Configure Integration Attachment Service
Create Integration Attachment Service, then Configure Integration Attachment Service
Configure Integration Attachment Service, then Create Integration Service Attachment
In the Workday Pro Integrations program, the process of uploading an XSLT file for a brand-new Document Transformation system follows a specific workflow designed to ensure the transformation logic is properly attached and configured within the integration system. The correct sequence involves first creating the XSLT Attachment Transformation and then configuring the Integration Attachment Service to utilize it. Here's a step-by-step breakdown based on Workday's integration methodology:
Create XSLT Attachment Transformation:
The initial step is to create an XSLT Attachment Transformation object within Workday. This involves uploading the XSLT file, which contains the transformation logic needed to convert XML data into the desired format for the Document Transformation system. In Workday, XSLT (Extensible Stylesheet Language Transformations) is used to define how data from a source (typically in XML format) is transformed into an output format compatible with an external system.
To do this, you navigate to the Integration System, access the related actions, and select the option to create a new "XSLT Attachment Transformation." You then name the transformation, upload the XSLT file (with a size limit of 30 MB as per Workday specifications), and save it. This step establishes the transformation logic as an object that can be referenced by the integration system.
Configure Integration Attachment Service:
Once the XSLT Attachment Transformation is created, the next step is to configure the Integration Attachment Service to incorporate this transformation. The Integration Attachment Service is a component of the Document Transformation system that handles the delivery or processing of the transformed data.
In this step, you edit the integration system, navigate to the "Services" tab, and configure the Integration Attachment Service. Here, you specify the previously created XSLT Attachment Transformation as the transformation to be applied. This links the XSLT logic to the integration workflow, ensuring that the data processed by the Document Transformation system is transformed according to the uploaded XSLT file.
Why Other Options Are Incorrect:
A. Configure XSLT Attachment Transformation, then Create Integration Attachment Service: This is incorrect because you cannot "configure" an XSLT Attachment Transformation before it exists. It must first be created as an object in Workday before any configuration or association with services can occur.
C. Create Integration Attachment Service, then Configure Integration Attachment Service: This option skips the creation of the XSLT Attachment Transformation entirely, which is a critical step. Without the transformation defined, configuring the service alone would not enable the XSLT upload or its functionality.
D. Configure Integration Attachment Service, then Create Integration Service Attachment: This sequence is reversed and misleading. The Integration Attachment Service must be configured to use an existing XSLT Attachment Transformation, not the other way around. Additionally, "Create Integration Service Attachment" is not a standard term in this context within Workday documentation.
Workday Pro Integrations Study Guide References:
Workday Integration System Fundamentals: This section outlines the components of an integration system, including the use of XSLT for document transformation and the role of attachment services.
Document Transformation Module: Specifically details the process of uploading and applying XSLT files, emphasizing the creation of an XSLT Attachment Transformation followed by its configuration within the integration services.
Core Connectors and Document Transformation Course Manual: Provides practical steps for setting up transformations, including the sequence of creating and then configuring transformation attachments (e.g., Activities related to "Upload a Custom XSLT Transformation" and "Edit XSLT Attachment Transformation").
Workday Community Documentation: Confirms that XSLT files are uploaded as attachment transformations and then linked to services like the Integration Attachment Service for processing.